
How to implement help for a Qt application using QHelpEngine
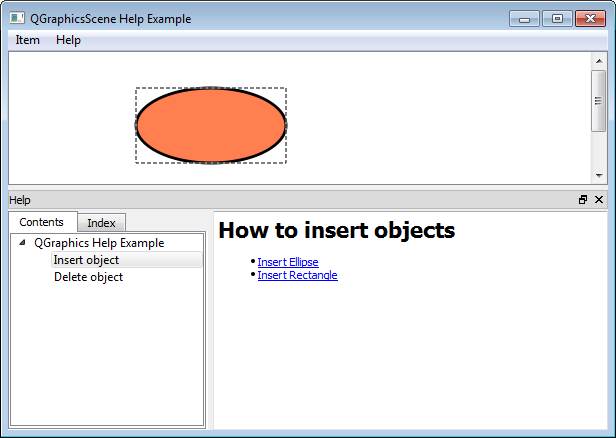
This article demonstrates how to implement help for a Qt application using QHelpEngine. The implementation is explained in a simple graphics application that enables to insert an ellipse or a rectangle via a menu and provides help for insertion and deletion of items. The resulting application with help can be seen below.
helpexample/mainwindow.cpp
helpexample/main.cpp
helpexample/helpbrowser.h
helpexample/helpbrowser.cpp
helpexample/qgraphicshelpexample.qrc
helpexample/icons/ellipse.png
helpexample/icons/rectangle.png
helpexample/documentation/qgraphicshelpexample.qch
helpexample/documentation/qgraphicshelpexample.qhc
helpexample/qgraphicshelpexample.pro (Qt 5)
This implementation uses QHelpEngine rather than Qt Assistant to provide help. If you intend to use Qt Assistant, check this official example.
To implement help we have to do the following:
- prepare compressed version of the html files that represent help. We are only going to ship the compressed version of the help (two binary files .qhc and .qch) rather than the original html files.
- implement slots insertObject(), about() and override keyPressEvent(). These are related to the functionality of the application rather than help.
- create instances of help-related widgets such as QDockWidget, QTabWidget, QSplitter and subclass QTextBrowser
- create and setup an instance of QHelpEngine to which we pass the compressed qhc file that we prepared at the beginning
How to prepare the compressed version of the help files
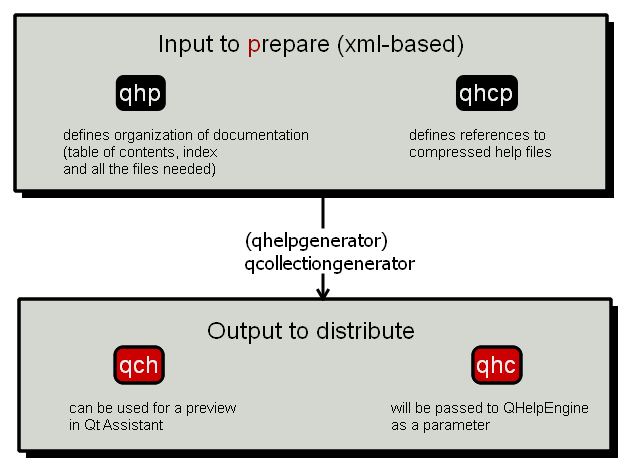
As I said before, we are only going to ship the compressed version of the help files (i.e. two binary files .qch and .qhc) rather than multiple HTML files. In order to obtain the compressed version, we are going to use the qcollectiongenerator. The qcollectiongenerator needs to know how the individual HTML files come together, i.e. it needs to know the overall structure of the help. We are going to provide this information in two XML-based files with the extension .qhcp and .qhp. To sum it up, in order to obtain the compressed version of help we need to create:
- individual html (possibly also css and image) files. These are regular html files so their preparation will not be explained here.
- .qhp file (an xml-based file)
- .qhcp file (an xml-based file)
To remember which files represent compression input and which represent the output you can use the following hint: The input files (.qhp and .qhcp) both contain the letter "p" (as "prepare"). The output compressed binary files do not contain the letter 'p'.
How to prepare the xml-based qhp file
The qhp file (Qt help project file) is an input file for the help generator. In this file we have to describe the organization of your help documentation, i.e. a table of contents, what will be in the index and provide references to the documentation files (*.html). Have a quick look at the contents of the file. The detailed explanation follows.
<?xml version="1.0" encoding="UTF-8"?>
<QtHelpProject version="1.0">
    <namespace>walletfox.qt.helpexample</namespace>
    <virtualFolder>doc</virtualFolder>
    <filterSection>
        <toc>
            <section title="QGraphics Help Example" ref="index.html">
                <section title="Insert object" ref="./insertobject.html"></section>
                <section title="Delete object" ref="./deleteobject.html"></section>
            </section>
        </toc>
        <keywords>
            <keyword name="Insert rectangle" ref="./insertrectangle.html"/>
            <keyword name="Insert ellipse" ref="./insertellipse.html"/>
            <keyword name="Delete object" ref="./deleteobject.html"/>
        </keywords>
        <files>
            <file>index.html</file>
            <file>insertobject.html</file>
            <file>insertellipse.html</file>
            <file>insertrectangle.html</file>
            <file>deleteobject.html</file>
            <file>images/ellipse.png</file>
            <file>images/rectangle.png</file>
        </files>
    </filterSection>
</QtHelpProject>
We first define a unique <namespace> for the documentation and a <virtualFolder>, i.e. the root directory of all files referenced in a compressed help file. The virtual folder exists so that we do not have to specify absolute links. You can call the namespace and virtual folder whatever you like but afterward, you have to remain consistent with your choices. The virtual folder cannot contain any '/'.
    <namespace>walletfox.qt.helpexample</namespace>
    <virtualFolder>doc</virtualFolder>
The <toc> i.e. the table of contents section shows what pages will be displayed in the Contents tab and how. The contents can be nested and have multiple levels (in this case only 2). This can be seen below. Note that subpages are indicated with ./
        <toc>
            <section title="QGraphics Help Example" ref="index.html">
                <section title="Insert object" ref="./insertobject.html"></section>
                <section title="Delete object" ref="./deleteobject.html"></section>
            </section>
        </toc>
Notice that items specified in the qhp file are displayed on the left side in the Contents tab, the right side displays the contents of the HTML pages that we created at the start. More on the display of help later.

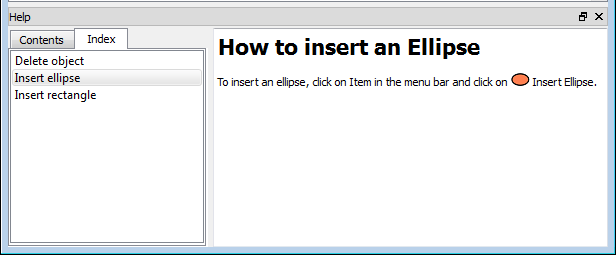
In the <keywords> section we indicate what we would like to have displayed in the Index section. You can see this in the figure below.
        <keywords>
            <keyword name="Insert rectangle" ref="./insertrectangle.html"/>
            <keyword name="Insert ellipse" ref="./insertellipse.html"/>
            <keyword name="Delete object" ref="./deleteobject.html"/>
        </keywords>
The <file> section lists all the files that we need for the generation of help, including image and stylesheet files. This has to be coherent with the structure of the folder in which we are generating help (which does not necessarily have to be our project folder).
        <files>
            <file>index.html</file>
            <file>insertobject.html</file>
            <file>insertellipse.html</file>
            <file>insertrectangle.html</file>
            <file>deleteobject.html</file>
            <file>images/ellipse.png</file>
            <file>images/rectangle.png</file>
        </files>
How to prepare the qhcp file
The basic structure of the .qhcp file is simple as it only needs to store the reference to the future .qch compressed help file. In our case it also contains the definition of <input> and <output>. The definition of these files enables to skip one step of the compilation. If we did not define <input> and <output> we would have to run an extra command (qhelpgenerator) to create .qch from the .qhp file. Like this we only need to run one command (qcollectiongenerator).
<?xml version="1.0" encoding="UTF-8"?>
<QHelpCollectionProject version="1.0">
    <docFiles>
        <generate>
            <file>
                <input>qgraphicshelpexample.qhp</input>
                <output>qgraphicshelpexample.qch</output>
            </file>
        </generate>
        <register>
            <file>qgraphicshelpexample.qch</file>
        </register>
    </docFiles>
</QHelpCollectionProject>
How to compress the html files
Now that we have the .qhp and .qhcp files ready we can perform the compression of the HTML files. For the compression, we need to call the qcollectiongenerator in the following form:
qcollectiongenerator qgraphicshelpexample.qhcp -o qgraphicshelpexample.qhc
You do not have to store the HTML files in your project folder. You can prepare them and compress them in any other folder and copy the resulting compressed files (.qch and .qhc) into your project folder.
For Windows users: You need a command line interpreter to execute the qcollectiongenerator command. You can access it via Start->Run..->cmd.exe. Position yourself (with the cd command) into the folder where you store the HTML, qhp and qhcp files. Then run the command above. You might need to replace the qcollectiongenerator with the full path of the executable (in my case C:\QtSDK\Desktop\Qt\4.8.0\mingw\bin\qcollectiongenerator.exe). Also, anytime you make a change to your HTML files, do not forget to rerun the qcollectiongenerator command.
You can preview the generated compressed help (.qch file) in Qt Assistant (in Windows you can find the executable assistant in Windows under C:\QtSDK\Desktop\Qt\4.8.0\mingw\bin, C:\Qt\5.4\mingw491_32\bin or something similar). Once you see the window of Qt Assistant, you can display your help by adding your .qch file to Settings -> Documentation. There is one problem, though. While you will be able to see the Content and Index that you created (left side), you might not be able to see any HTML pages after you click on the content or index items as Qt assistant does not seem to display files that are less than 512 bytes in size (unfortunately, this is our case). This is, however, only a problem if you want to preview your help before you actually connect it to your project. It won't be a problem for deployment as we are using QTextBrowser rather than Qt Assistant to display our help.
Implementation of MainWindow
This section shortly explains the functionality of our application. You only need to scan through this section, the most important part comes in the section 'How to construct the helpWindow'.
class MainWindow : public QMainWindow
{
    Q_OBJECT

public:
    MainWindow();

protected:
    void keyPressEvent(QKeyEvent *);

private slots:
    void about();
    void insertItem();

private:
    void createActions();
    void createMenus();
    void createConnections();
    void createHelpWindow();

    QGraphicsView* view;
    QGraphicsScene* scene;

    QMenu *itemMenu;
    QAction *insertEllipseAction;
    QAction *insertRectangleAction;

    QMenu *helpMenu;
    QAction *helpAction;
    QAction *aboutAction;
    QDockWidget* helpWindow;
};
In createActions() we instantiate the insertEllipseAction and insertRectangleAction. These will be part of itemMenu. We also instantiate the helpAction and aboutAction which will be part of the helpMenu. The helpMenu stores actions for displaying help and information about the application.
void MainWindow::createActions()
{
    insertEllipseAction = new QAction(tr("Insert &Ellipse"), this);
    insertEllipseAction->setIcon(QIcon(":/icons/ellipse.png"));

    insertRectangleAction = new QAction(tr("Insert &Rectangle"), this);
    insertRectangleAction->setIcon(QIcon(":/icons/rectangle.png"));

    helpAction = new QAction(tr("Help Contents..."), this);
    helpAction->setShortcut(QKeySequence::HelpContents);

    aboutAction = new QAction(tr("&About"), this);
}

void MainWindow::createMenus()
{
    itemMenu = new QMenu(tr("&Item"), this);
    itemMenu->addAction(insertEllipseAction);
    itemMenu->addAction(insertRectangleAction);

    helpMenu = new QMenu(tr("&Help"), this);
    helpMenu->addAction(helpAction);
    helpMenu->addAction(aboutAction);

    menuBar()->addMenu(itemMenu);
    menuBar()->addMenu(helpMenu);
}


Both insertEllipseAction's and insertRectangleAction's signal triggered() calls the corresponding slot insertItem(). In insertItem() we firstly determine which of the actions called the slot and then insert the corresponding item.
void MainWindow::insertItem(){
    QAction* action = qobject_cast<QAction*>(sender());
    if(action){
        QGraphicsItem* itemToAdd = 0;
        QPen mPen(Qt::black, 3, Qt::SolidLine);
        QBrush eBrush(QColor("#FF7F50"));
        QBrush rBrush(QColor("#CC0000"));
        if(action->iconText() == "Insert Ellipse")
            itemToAdd = scene->addEllipse(0,0,150,75, mPen, eBrush);
        else if(action->iconText() == "Insert Rectangle")
            itemToAdd = scene->addRect(0,0,100,100, mPen, rBrush);
        if(itemToAdd)
            itemToAdd->setFlags(QGraphicsItem::ItemIsSelectable |
                               QGraphicsItem::ItemIsMovable);
    }
}
The aboutAction calls the about() slot which displays a QMessageBox with the description of the application. This can be seen below:
void MainWindow::about()
{
    QMessageBox::about(this, tr("About QGraphicsScene Help Example"),
                       tr("This example demonstrates how to implement\n"
                          "help for a Qt application."));
}
The helpAction is responsible for displaying help via helpWindow. This is achieved by connecting its signal triggered() to the slot show() of the helpWindow. The helpWindow is a QDockWidget that acts as a wrapper for all help-related widgets. The construction of the helpWindow will be explained in detail later on.
void MainWindow::createConnections(){
    connect(insertEllipseAction, SIGNAL(triggered()),
            this, SLOT(insertItem()));
    connect(insertRectangleAction, SIGNAL(triggered()),
            this, SLOT(insertItem()));
    connect(helpAction, SIGNAL(triggered()),
            helpWindow, SLOT(show()));
    connect(aboutAction, SIGNAL(triggered()),
            this, SLOT(about()));
}
Last, we also override keyPressEvent(). Anytime the user presses the Delete key, the selected items will be deleted. We remove the item from the scene before deleting it. This is not absolutely essential, but it makes the deletion more efficient.
void MainWindow::keyPressEvent(QKeyEvent *event){
    if(event->key() == Qt::Key_Delete){
        foreach(QGraphicsItem* item, scene->selectedItems()){
            scene->removeItem(item);
            delete item;
        }
    }
    else
        QMainWindow::keyPressEvent(event);
}
How to construct the helpWindow
Our help window is represented by an instance of QDockWidget that shows up at the bottom of the main window anytime we press F1 (or Ctrl+? on Mac OS X) or click on Help Contents. Have a quick look at the code snippet that constructs the help window. The details follow.
void MainWindow::createHelpWindow(){
    QHelpEngine* helpEngine = new QHelpEngine(
                QApplication::applicationDirPath() +
                "/documentation/qgraphicshelpexample.qhc");
    helpEngine->setupData();

    QTabWidget* tWidget = new QTabWidget;
    tWidget->setMaximumWidth(200);
    tWidget->addTab(helpEngine->contentWidget(), "Contents");
    tWidget->addTab(helpEngine->indexWidget(), "Index");

    HelpBrowser *textViewer = new HelpBrowser(helpEngine);
    textViewer->setSource(
                QUrl("qthelp://walletfox.qt.helpexample/doc/index.html"));
    connect(helpEngine->contentWidget(),
            SIGNAL(linkActivated(QUrl)),
            textViewer, SLOT(setSource(QUrl)));

    connect(helpEngine->indexWidget(),
            SIGNAL(linkActivated(QUrl, QString)),
            textViewer, SLOT(setSource(QUrl)));

    QSplitter *horizSplitter = new QSplitter(Qt::Horizontal);
    horizSplitter->insertWidget(0, tWidget);
    horizSplitter->insertWidget(1, textViewer);
    horizSplitter->hide();

    helpWindow = new QDockWidget(tr("Help"), this);
    helpWindow->setWidget(horizSplitter);
    helpWindow->hide();
    addDockWidget(Qt::BottomDockWidgetArea, helpWindow);
}
Do not forget to add CONFIG += help into your *.pro file.
To retrieve help we construct an instance of QHelpEngine and call its function setupData(). Notice that we pass as a parameter to QHelpEngine the binary collection file qgraphicshelpexample.qhc which we prepared at the start.
    QHelpEngine* helpEngine = new QHelpEngine(
                QApplication::applicationDirPath() +
                "/documentation/qgraphicshelpexample.qhc");
    helpEngine->setupData();
Note: The Qt resource mechanism cannot be used for storing the help content, as the compiled help files are SQLite databases. The qch and qhc should be distributed just like regular files.
Note: QApplication::applicationDirPath() returns the directory that contains the application executable. Make sure that the folder documentation/ (with the qhc and qch files inside) is in the same folder as the executable.
After that, we create an instance of QTabWidget (left side of the help viewer) into which we add contentWidget() and indexWidget() retrieved from the QHelpEngine.
    QTabWidget* tWidget = new QTabWidget;
    tWidget->setMaximumWidth(200);
    tWidget->addTab(helpEngine->contentWidget(), "Contents");
    tWidget->addTab(helpEngine->indexWidget(), "Index");
We also construct an instance of a HelpBrowser (right side of the help viewer). HelpBrowser is a subclass of a QTextBrowser. The details of the HelpBrowser will be explained in the next section. We set the initial page of the HelpBrowser to 'qthelp://walletfox.qt.helpexample/doc/index.html'. I constructed this path from the <namespace> and the <virtualFolder> that I defined in the qhp file at the start.
    HelpBrowser *textViewer = new HelpBrowser(helpEngine);
    textViewer->setSource(
                QUrl("qthelp://walletfox.qt.helpexample/doc/index.html"));
The left and right side of the viewer need to communicate with each other, i.e. anytime we click on a particular link in the contentWidget() or indexWidget(), we want the HelpBrowser to display the relevant html page. This is achieved by connecting QHelpContentWidget's signal linkActivated(QUrl) to the QTextBrowser's slot setSource(QUrl). Similarly for the QHelpIndexWidget, with the difference that we choose to ignore the second argument of the linkActivated(QUrl, QString) signal.
    connect(helpEngine->contentWidget(),
            SIGNAL(linkActivated(QUrl)),
            textViewer, SLOT(setSource(QUrl)));
    connect(helpEngine->indexWidget(),
            SIGNAL(linkActivated(QUrl, QString)),
            textViewer, SLOT(setSource(QUrl)));
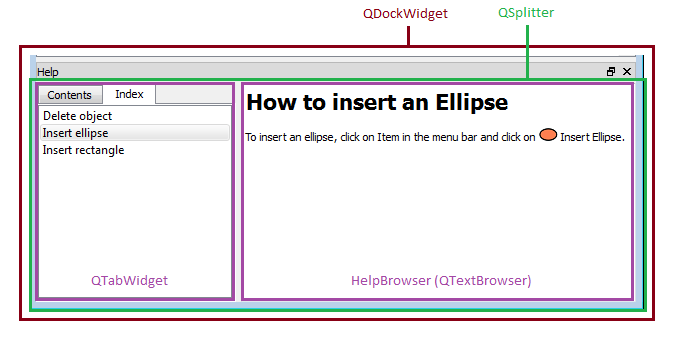
At the end, we insert both the left (QTabWidget) and right side (HelpBrowser) into an instance of QSplitter. Like this, we can control the size of the widgets by dragging their boundary. Last, we create an instance of QDockWidget which will act as a wrapper for QSplitter with all help-related widgets.
    QSplitter *horizSplitter = new QSplitter(Qt::Horizontal);
    horizSplitter->insertWidget(0, tWidget);
    horizSplitter->insertWidget(1, textViewer);
    horizSplitter->hide();

    helpWindow = new QDockWidget(tr("Help"), this);
    helpWindow->setWidget(horizSplitter);
    helpWindow->hide();
    addDockWidget(Qt::BottomDockWidgetArea, helpWindow);
Why and how to subclass QTextBrowser
In order to display help we are going to use HelpBrowser which is a subclass of the existing class QTextBrowser. Subclassing is needed so that the QTextBrowser can handle URLs with the scheme qthelp:// that are used by the help engine. To accomplish this we pass an instance of QHelpEngine to the HelpBrowser's constructor and override the loadResource() function. The loadResource (int, QUrl) is called anytime the document is loaded and also for each image in the document. The function is invoked via setSource(QUrl) slot of the QTextBrowser.
class HelpBrowser : public QTextBrowser
{
public:
    HelpBrowser(QHelpEngine* helpEngine, QWidget* parent = 0);
    QVariant loadResource (int type, const QUrl& name);
private:
    QHelpEngine* helpEngine;
};
HelpBrowser::HelpBrowser(QHelpEngine* helpEngine,
                         QWidget* parent):QTextBrowser(parent),
                         helpEngine(helpEngine)
{
}

QVariant HelpBrowser::loadResource(int type, const QUrl &name){
    if (name.scheme() == "qthelp")
        return QVariant(helpEngine->fileData(name));
    else
        return QTextBrowser::loadResource(type, name);
}
The implementation of HelpBrowser was taken over from Using QtHelp to Lend a Helping Hand.
That's it! This should get you started. Try to run the application and display the help.
Tagged: Qt